Have you ever wondered if you, as a software developer, can do more to reduce your carbon footprint? What about the carbon footprint of all the apps you’ve deployed?
Generally, in software development, you don’t hear a lot about this topic. But why is that? Can we not make enough impact? Is it even worth putting some effort in?
Changing mindset
There are a lot of aspects in which software can be made more efficient, in order to reduce the computing power needed. Database queries can be made more performant, extra roundtrips can be avoided, unnecessary data doesn’t have to be stored, redundant calculations may be removed, log retention and the amount of logs could be reduced, multiple application instances running simultaneously could potentially be scaled down,… You name it. But do we actually care enough? Usually, when we think of improving these things, we usually do it to improve user experience, but rarely do we think about the ecological impact. We can actually change that. Let’s be a little more conscious in how we technically design our applications. The more of us who think about it, the more significant the overall impact can become over our shared application landscapes.
The trigger
To be honest with you, I didn’t always kept the ecological point of view in mind while developing applications. Sure, I thought about performance and log retention, caching were it would be advantageous, reducing round trips, introducing indexes in database queries, but I didn necessarily have the ecological footprint of the application in mind. But then I came accross an interesting post on LinkedIn, that changed this:
This immediately triggered me, and I went on to watch the Devoxx presentation on YouTube, which I truly recommend watching:
Green scheduling
Let’s talk a bit more about the software in the conference talk.
What is it? In a nutshell, it is software that allows you to schedule recurring tasks, like nightly jobs, considering the carbon intensity at the planned execution time. The aim is to run the task at the most opportune moment, being the window of time where carbon intensity would be at its lowest point.
Currently, the software consists of a propriatry API (maintained by First8) as well as an open source Java library. There are plans to support more programming languages in the future. Currently there is already support for the Spring and Quarkus frameworks.
The API is in charge of calculating the most desirable window in which to execute a given job, for a given time zone and region. It also takes an expected duration amount into consideration. Currently, the API is free of charge, but you do require an API key. You can easily set it up though, do go through the steps as documented on their Get Started page.
The library provides the annotation, its processing and the logic calling the API and the scheduled job management.
You are most likely already familiar with Spring’s Scheduled annotation, where you would define recurring jobs like so for example: @Scheduled(cron = "0 0 2 * * ?", zone = "Europe/Brussels"). Using the library’s equivalent annotation, you would define that like so: @GreenScheduled(fixedWindow = "02:00 08:00", carbonIntensityZone = "BE", duration = "1h" timeZone= "Europe/Brussels"). Note that instead of always running the job at 2AM, now we specify a time window. The carbonIntensityZone maps to a region as defined with ENTSO-E, from which the API consumes data. You also see that we need to pass a duration parameter, this is mandatory at the moment, and can be a rough estimation of the time the batch job would need to complete. Perhaps, this will be made a bit smarter in the future.
An example I’m personally already using in a hobby project:
As you can see, there’s different options for defining when the job has to run. Of course, you would have to use this mindfully. If the job you want to execute is required to run at a specific time (do ask the question: why?), this approach doesn’t fit your case. But for jobs, like the above, where the execution time is not that important, go for it!
Now, imagine the impact it would make if all of us would consider something like this when setting up scheduled jobs. Every job can literally contribute in reducing the carbon footprint.
Even considering the downside of the extra API call and the computing power required for it to come up with the most suitable execution time, we will usually save more carbon, given we setup wide enough windows.
However, the supported regions, at the time of writing, only include ‘NL’. First8 (a Dutch company) does however plan to support a lot more regions, but the timeline on that is not yet very clear. If you are interested in support for a given region, do contact them to request support for it.
Do not hesitate to contribute to the project on GitHub. The team is welcoming any change or improvement and they setup very easy-to-follow setup and contribution guidelines.
I’m playing around with the software myself. I’m evaluating wether it is ready for use in production applications (mostly region support seems to be lacking). I’ve also contributed 2 minor changes to the library to show my support: – Implement Autocloseable on schedulers – Javadoc improvements
Green energy production often relies on multiple weather factors like, sun, wind, rain (for hydro plants),… And this little piece of software tries to make better use of that.
Moving forward
The green-scheduler I’ve just ellaborated on is of course not the only answer to improving our shared carbon footprint. It is a good step in the right direction. It makes us reflect on what we can do better. And that’s exactly it, that’s exactly what we need to start doing a little bit more.
Do you have suggestions to further improve ourselves on the topic? Or are there already other things you are actively doing to make an impact? Do let me know in a comment, I would be very interested in hearing about it, or to start a conversation!
A while ago, I built my very first Chrome web extension, ‘Belgian Train Station‘. I felt like playing around with Javascript for a bit again. Building a basic extension that solved a small problem seemed the perfect way to do that!
Let me give you an overview of the project.
The problem
To be honest, there is no real big problem at hand here. In Belgium, where I live, the national railway company is called NMBS. This company, like any other self-respecting national railway company, has their own website where you can perform searches to plan your journey. However, it seems like there is no real good overview available to view time tables for arriving and/or departing trains for a specific train station.
iRail does have something like that, however, the displayed information is very concise (they call it ‘Liveboard’).
Looking at iRail’s solution, I noticed that they use a free and publicly available API. So I read through their documentation.
The logo of Belgian Train Station
The solution
I had only a few requirements;
add translations in the country’s 3 official languages (Dutch, French and German) as well as English
keep it simple
show all relevant data for departures and arrivals.
A simple Chrome extension such as this one only really needs one basic index.html. So I created one that merely contains all the necessary skeleton and references to the stylesheet and scripts.
I structured the JS code into 3 main scripts: dataService.js, utils.js and popup.js. The first one would house all code related to fetching data via the iRail API, the second one would hold any common utilities I deemed useful, the popup script is meant to contain all displaying logic.
function determineAPILanguageFromUILocale(i18n) { const uiLanguage = getMessage(i18n, '@@ui_locale').substring(0, 2); // Only interested in the 2 first chars
return SUPPORTED_API_LANGUAGES.includes(uiLanguage) ? uiLanguage : 'en'; // Get matching lang or default to en }
async function getLiveBoard(i18n, stationName, movementType) { let movement;
switch (movementType) { case MOVEMENT_TYPE.DEPARTURE: movement = Symbol.keyFor(MOVEMENT_TYPE.DEPARTURE); break; case MOVEMENT_TYPE.ARRIVAL: movement = Symbol.keyFor(MOVEMENT_TYPE.ARRIVAL); break default: movement = Symbol.keyFor(MOVEMENT_TYPE.DEPARTURE); }
// Use this method to avoid inspection warnings on i18n's getMessage method function getMessage(i18n, key) { let result = key; if (i18n) { // noinspection JSUnresolvedReference result = i18n.getMessage(key) ? i18n.getMessage(key) : key; }
return result; }
// Use this method to avoid inspection warnings on chrome's runtime.getManifest method function getManifest() { // noinspection JSUnresolvedReference return chrome.runtime.getManifest(); }
function showTime(clock, hours, minutes, seconds) { const date = new Date(); if (!clock.matches(':hover')) { // Do not constantly update the tooltip while showing it (it will flash) clock.title = date.toLocaleString(); } hours.innerText = date.getHours().toString().padStart(2, "0"); minutes.innerText = date.getMinutes().toString().padStart(2, "0"); seconds.innerText = date.getSeconds().toString().padStart(2, "0"); }
Now for the translations! This is a cornerstone feature of the application, as in Belgium, localisation is always important (3 national languages!).
Getting messages can be done like so:
getMessage(i18n, 'departures')
where ‘departures’ represents a translation key. For each language we need a directory (‘en’ for English for example) containing a messages.json file. That file contains a simple JSON structure containing all the translation keys and there actual value. So in the case of the ‘departures’ example, such a pair would look like this:
"departures": {
  "message": "Departures",
  "description": "Label for the amount of departures."
}
After having implemented the above, a manifest.json file is required to glue it all together and to provide some packaging details:
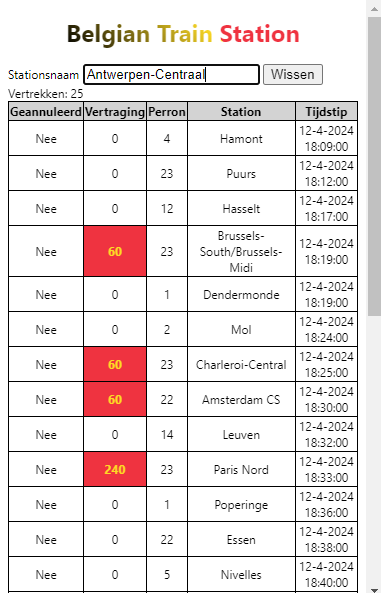
Easy! After installation, just open the extension by clicking on the icon. A popup will appear. You can then select wether you’d like to view departures or arrivals and enter the name of the train station you want to view the live data for. That’s it! No more need for a quick Google. There is a official NMBS app, but they don’t offer a view like this one.
For the rest, I’ll leave you with the magic of experiencing the little tool yourself. I do hope you’ll enjoy the theme (light/dark) mechanism and the automatic language detection. The code is open-source, so feel free to report any issues or contribute to the project. I’m sure there is room for improvement (I’m thinking of a station selection view for example).
One of the new features in Java 9 is called ‘JShell’ and it’s awesome. It is basically a Read–Eval–Print Loop (REPL) implementation for the Java language.
You can run JShell in a command line environment (command prompt (cmd) on Windows, Terminal on Mac). If your JAVA_HOME path is set correctly, you could simply type in ‘jshell’ and hit enter. You can find the executable in the jdk-9.jdk/Contents/Home/bin directory.
A launched Terminal instance with JShell running.
Imports
A good thing to keep in mind is the fact that a freshly opened session comes with multiple imports:
You might as well add any other import. Syntax: import your.package.name.
Expressions and Variables
Since JShell is a Java interpreter, any valid Java expression will be accepted. Find an example expression testing String equality.
jshell> "Hello".equals("World")
$1 ==> false
The result in this obvious example returns false. Note that a variable $1 has been created as well. Execute a similar expression again and you’ll see another variable has been created. Notice the incremental naming ($2 and so on). Creating your own named variables is as easy as:
jshell> String myVariable = "awesome"
Keeping track of all your variables can be done using the /vars command:
Creating or replacing methods is done simply by inputting the entire method definition. Below example creates a method to print any given String and executes it afterwards.
jshell> void printSomething(String s) { System.out.println(s); }
|  created method printSomething(String)

jshell> printSomething("Hi there!")
Hi there!
Listing methods can be done in a way similar to listing variables, using the command /methods.
If you have a long method to edit, I invite you to use /edit <nameOfMethod>. This will open an external editor that is slightly easier to work with for long snippets. Use /edit without parameters to edit the entire anything in the current state. To reset your entire JShell state, use /reset.
Scripting
Have bigger snippets to evaluate? Consider playing around with scripts, which have the <script>.jsh format. To create a script you could simply create a file from scratch or you could issue the command: /save mySnippets.jsh, which saves your current state into the given file.
Say our mySnippets.jsh looks like this:
"Hello".equals("World");
$1 == true
System.out.println("$1 is " + $1 + " and $2 is " + $2)
String myVariable = "awesome";
void printSomething(String s) { System.out.println(s); }
printSomething("Hi there!")
Then we could run (load) it using the /open command.
jshell> /open mySnippets.jsh
$1 is false and $2 is false
Hi there!
awesome
Plenty more advanced stuff you could do with JShell scripts. You might as well be interested in setting a particular script as your starting state, but I’ll leave that as an exercise for the reader.
JShell API
Interpreting Java code within a Java application is now possible using Java 9’s built-in jd.jshell API! Use it for small code evaluations or to run scripts.
I won’t go over this part in depth, because it’s rather self explanatory. However I’ll give a very basic example (you could’ve probably figured out on your own).
import java.util.List;
import jdk.jshell.JShell;
import jdk.jshell.SnippetEvent;

public class Main {

    public static void main(String[] args) {
        try (JShell js = JShell.create()) {
            int yearsOld = 5;
            List<SnippetEvent> snippetEvents = js.eval("String.format(\"I'm %d years old!\", " + yearsOld + ")");
            snippetEvents.forEach(snippetEvent -> System.out.println(snippetEvent.value()));
        }
    }
}
To run scripts, I’ll gladly refer to DZone’s article to get you started extremely quickly. In their code sample you will be able to run any script you provide to their executor implementation. It also comes with some basic event handling (handling failing evaluations). However running their example I noticed that all statements in the provided script must end with a semicolon, otherwise your output might end up looking like Evaluation failed : Snippet:ErroneousKey#1-"Hello".equals("World").
Conclusion
The power of instant expression evaluation feedback surely is useful. I can imagine myself using JShell for quick checks on String formats and small stuff like that. Besides that, I like the fact that the the new feature along with its API support scripting. You could have a static code base that calls scripts that can be changed whenever necessary.
Obviously this is just JShell in a nutshell (that could’ve been a great post title as well I reckon!) and there’s much more to it. The purpose of this post was to quickly go over the very basics and to show the new feature to those who hadn’t heard of it yet.
Play around with JShell yourself. You’ll need to install JDK 9. If you haven’t installed it already, go ahead and download it now.
Developing your navigation needs in default Vaadin is ok, but I thought it could be enhanced a bit. Hence the idea of creating a new addon, NavigationBuilder.
The Idea Behind the Addon
In fact there where multiple reasons why I wanted to create some additional navigation functionality. Chaining calls to build navigation actions seemed just right. With such an approach you can achieve incredibly readable code, when properly formatted.
Besides the readability and the need to create navigation calls in a unified way, I thought that navigation actions often provide good events to trigger your own custom code. An event-handling implementation seemed suitable.
The general purpose was to make it all easier and more accessible. I also wanted to bundle refresh, back and next actions in the implementation, as they are simply navigation calls.
Builder Approach
It seemed fairly logical to apply a builder-pattern in the library. Let’s crack on with a quick example.
NavigationUtils.navigate()
                .to("www.google.com")
                .inNewTab()
                .withListener(event1 ->
                 LOGGER.trace("Navigating to external url in a new tab."))
                .go();
With the above formatting, the chained calls are easy to read. The opening method NavigationUtils.navigate(); provides us with the Builder object from which we’ll always start. In the example above we specify an external destination url and we tell the builder that we’ll want to open the link in a new tab. After that, we attached a listener that executed our own custom code (in this case a simple log output line). Calling .go(); will build our navigation action and perform it right away. Straight forward, right?
In fact, many calls are optional and can simply be left out. The action can also be stored in a variable for later execution. That would look something like the next example.
This way you can prepare all the required actions beforehand and just perform them whenever needed.
Reduced Boilerplate
At the moment of writing boilerplate code can be slightly reduced. The NavigationUtil class contains a few methods with very common navigation needs pre-configured.
Here are a few examples of how you could use those pre-built actions.
NavigationUtils.createReloadNavigation().withListener(l -> System.out.println("Page reloaded!")).go(); // Adding a listener to the pre-configured navigation.
NavigationUtils.createBackNavigation().go(); // Go back one page in the browser history
NavigationUtils.createNextNavigation().go(); // Go one page forward in the browser history
In fact, that pretty much sums it all up for now. If you have additional ideas for expanding the project, feel free to share them. I will respond to questions and feedback in comments.
If you are experiencing issues, please file them on GitHub. They will all be looked at.
The addon’s version at the time of writing is 1.1.2. Note that the addon will get updated every so often, so be aware of changes.
Many projects deal with application-wide parameters, mostly called properties. These are inputs to the program, that wouldn’t normally be changed. They do however provide for simple setup in multiple circumstances.
When to Use Properties
Good example situations in which properties would come in handy are database and email setups. If your application sends out mails, it will need to set some parameters, like protocol, host and port. If authentication is involved, properties should cover them as well. In your emailing implementation you would then read out the property values and handle them however required.
Some application properties for outgoing email for local development.
There are many advantages of setting these parameters in one centralized file. One of which is that quick adjustments can easily be made, without touching the code (that is, when only values are edited). When an application is deployed on multiple environments (local development, acceptance, staging, production,…) it would be enough to adjust properties in accordance with the environment on which the app is running on.
Reading Properties in Spring
When it comes down to extracting the values from the property file(s) when using Spring, you have a few options.
The first option, which is also the quickest solution, is to use the @Value annotation on class members or directly in an autowired constructor, as a parameters.
@Autowired
 public MyConstructor(@Value("${my.property.name}") final String property) {
     this.property = property;
 }
Just pass your property key to the annotation. That’s it, no need to use any file reader, Spring deals with that for you. However this method is very quick and easy to implement, I’d like to point out that whenever you decide to edit the property key, you would also have to adjust it in the annotation value in code. And that would be for every annotation that reads out the edited property in question. This could obviously be made a bit more efficient and future proof.
Read Once, Access Anytime
A more solid approach would be to read all the properties (ideally when the application is launched) and put them into memory, so they would be accessible throughout the entire lifecycle of the program. Spring makes this incredibly easy, so this is by far the recommended approach.
Example class with properties in memory.
In the image above, you can see an example of a class containing application properties. It contains no business logic whatsoever. The class must be annotated with Spring’s @ConfigurationProperties annotation. You can pass a prefix value (the prefix of the property key) if so required. The nested classes cover the nested properties. The protocol property in the Mail class would be the described as cs.mail.protocol in the properties file in this case. If a property key requires editing in the future, only the key and its respective property should be adjusted in code, never more, never less.
The @Data annotation (Lombok) generates all the necessary getters and setters and it reduces boilerplate code at the same time (oh, and it makes you develop that little bit faster). You could of course provide the getters and setters yourself if you don’t want to use Lombok.
Additional Spring Configuration
Not much more left to do in order to make the properties accessible in any spring component. To follow the previous example, I’d like to bring in an example Spring configuration class:
@Configuration
@EnableConfigurationProperties({ CSProperties.class })
public class PropertiesConfig {

    private final CSProperties properties;

    @Autowired public PropertiesConfig(CSProperties properties) {
        this.properties = properties;
    }

    @Bean
    public CSProperties.Database getDatabase() {
        return properties.getDb();
    }

    @Bean
    public CSProperties.Mail getMail() {
        return properties.getMail();
    }

    @Bean
    public CSProperties.Background getBackground() {
        return properties.getBackground();
    }

    @Bean
    public CSProperties.Cache getCache() {
        return properties.getCache();
    }
What this class does is simply creating beans of the property elements. It injects our base properties class in the constructor and it creates beans of the inner classes, to make them injectable anywhere. The useful aspect of this implementation is the fact that whenever you autowire one of the subclasses, you don’t get all the other properties you don’t need. Basically you just need to grab the properties that are in scope of whatever functionality you’re developing. Obviously you can also grab al the properties whenever needed.
Since our properties class is statefull and it has getters as well as setters, we are also free to change the state of the property values while running the application. This can result in totally different application behaviour, so be careful with it. Perhaps you should add some security checks for the setters access.
To wrap things of, an example extract of a database configuration class that only injects the database properties (other properties aren’t necessary here):
private final CSProperties.Database dbProps;

    @Autowired public MyBatisConfig(CSProperties.Database dbProps) {
        this.dbProps = dbProps;
    }

    @Bean
    public DataSource dataSource() {
        SimpleDriverDataSource dataSource = new SimpleDriverDataSource ();
        dataSource.setDriverClass(com.mysql.cj.jdbc.Driver.class);
        dataSource.setUrl(dbProps.getUrl());
        dataSource.setUsername(dbProps.getUsername());
        dataSource.setPassword(dbProps.getPassword());

        return dataSource;
    }
Bonus: Property Metadata
Code completion and documentation above all. Spring actually makes it possible to attach custom metadata to your properties. IntelliJ actually detects when a property key has metadata, if so, it will provide code completion and additional information. You can also define the datatypes and default values.
Property metadata file.
Have your IDE generate a JSON file in your META-INF folder. The file will be called ‘additional-spring-configuration-metadata.json’. If you decide to use such a file, make sure to update it along with the edited property file(s).
By default, loading animations in Vaadin are already pretty awesome, though you might want to adjust them to make them fit better with your custom theme.
While tweaking around with the animations myself, I found that there wasn’t too much information to find about it around the web, so here’s me contributing.
It’s All CSS
To adjust the loading animations, there’s actually no need at all to fiddle in Java code. Everything can be easily set up in css. You only need to edit one file, which would be your custom theme’s scss file.
First of all, it is important to know that the styling for the animations is not located under the .v-app class. All the editing can be done top-level, right after the base theme include statement. For the Valo theme, this would be right after the following line: @include valo;.
Top Loading Indicator
In this example I will cover a minor tweak to the loading bar you see on the top of the page, which by default is blue. It is displayed upon page navigation.
To simply adjust the color you can use following code snippet, where all style attributes are just coppied from the default styling. The only property you’ll want to tweak will be the background-color one.
Since we’re at it, we might as well adjust the color of the spinner that shows when the connection was lost. Once again, this snippet must be placed outside the .v-app class. Obviously, if you want to adjust all spinners application-wide, apply the styling to the .spinner class only.
Vaadin’s default spinner is shown upon page refresh, for instance. At least in the Valo theme, it is relatively small. Its’ styling is somewhat basic, so it might be good to give it a more customized touch, like the spinner below.
A custom loading spinner.
Right along the previously provided css snippet, another one can be placed. Following example shows how to replace the default spinner with our own.
After these small tweaks in this one file you are all set and ready to check out the result of the applied changes.
Keep in mind that you will need to update the theme first. Vaadin has this Maven plugin com.vaadin:vaadin-maven-plugin:8.0.0, that you can add to your pom.xml. Once added, you can simply update and compile the theme and rebuild your project. Besides that, you will probably have to clear your browser’s cache before reloading your application. If you don’t do that, a previous version of your theme’s css file will be used.
Lately I have been working a bit with Vaadin, a web UI framework for business applications. The framework offers an experience similar to Swing. ‘Similar’ is a very important word here. Vaadin uses a component based approach as well, but it is not at all a carbon copy of Swing.
All Java
The main advantage about Vaadin is that its framework is written in Java, meaning that you could place your UI logic right next to your Java back-end logic. No need to hop from Java to Javascript or whatever other front-end programming language.
All of your UI code will run server-side. Vaadin will take care of server-client communication.
There is one small catch though. Custom styling is done in CSS (scss), so if you want to create a personalized theme, you will have to tweak around quite a bit in CSS files.
Strengths & Shortcomings
Vaadin’s biggest advantage is that you can use it to quickly create decent web application UI. You can even create your own theme fairly easily.
The framework is also struggling with some frustrating flaws. By default, Vaadin lacks the possibility to add Components to a Grid. If you want to do that anyway, you would have to install an addon. If the addon uses a widget set, it isn’t even a straight-forward installation.
Besides that I can provide a good example of an annoying flaw in Vaadin. As I was developing a Window that contained a Grid, I had the requirement to bind a boolean value to a column. The column wouldn’t just contain the boolean value as a String, but it was to be displayed as an OptionGroup with two values, ‘yes’ and ‘no’, with the correct value selected based on the boolean’s value.
The binding process went as follows: I defined a BeanItemContainer and from that I created a GeneratedPropertyContainer. On that container I performed calls of addGeneratedProperty() (for the OptionGroup I made use of a custom PropertyValueGenerator returning the OptionGroup to be displayed) . After all that I called setContainerDataSource() on the Grid. That was binding done, or at least I believed so. Once checking out the result in the UI, I noticed all cells were properly bound to their respective data, except for the OptionGroup one. Even more bizarre was the fact that at the time that a new record was added to the Grid, the data was correctly bound to all the OptionGroup cells. Somehow the Grid didn’t initialize correctly, I figured.
So it was time to find some workaround to this issue. Of course things went all smooth when using a CheckBox in stead of an OptionGroup, but that wasn’t really the requirement. Anyway, while playing around with Vaadin in some other personal project, I found out about vaadin-push. That is basically a dependency that enables you to update the UI from a different thread.
I ultimately fixed the issue by calling grid.getUI().push() right before calling grid.setColumns(). That did the trick, allthough it doesn’t look quite right.
Conclusion
I have been playing with the Vaadin framework for a few weeks now, and I’m sure I haven’t seen half of it yet. Overall I can say I’m satisfied with it, except for some frustrations that can arise on banal aspects. It is really easy to write UI fragments that are easy to read. It isn’t really hard to get into the basics. I also have to say it runs absolutely smoothly on any of my Tomcat configurations.
Overall, the framework is an excellent tool for web developers, but it is also an imperfect one. However, it is good to know that the company takes note of what developers are saying and they are always ready to help out.
If you’d like to see what Vaadin looks like, I strongly suggest you to play around with the Vaadin Sampler.
The other day I took another look at my IntelliJ IDEA Plugin project, ‘Pastebin Unofficial‘ and it’s notifications. At the time of writing this project is in a very early, basic stage, it is rather an idea that hasn’t been worked properly (yet).
Clickable links in notifications
So what the project does at this time, is create a Pastebin paste from the opened document in the IDE. You right click anywhere on the opened file and you select ‘New Paste’. A popup will appear for you to specify a paste title (the filename will be picked by default). When dismissing the dialog, a paste will be sent to Pastebin and a balloon notification will be displayed for a while in the bottom right corner of the IDE.
A balloon notification with link in IntelliJ IDEA.
The goal of the notification was to notify the user that the paste was successfully posted (a different notification would be shown when an error occurred). Only that would not be enough, no, a clickable link to this new paste would be appropriate as well.
Unfortunately, the original attempt didn’t satisfy the requirements:
In fact, it was rather naive to have used a simple html <a href="..."> tag. Even more impulsive was leaving out the required surrounding <html></html> tags.
As if those absolute failures weren’t enough, I also managed to completely ignore the latest parameter of Type NotificationListener. Passing null isn’t really going to do anything there, is it?
After a couple of Google searches I managed to find the solution. When instantiating the notification, I now include the proper surrounding tags and I provide a bit of code handling a click on the hyperlink.
It’s that time of the year again! Holidays are coming up along with the usual festivities. Here’s about my past year and what’s to come in 2017.
Looking back
Overall 2016 was a great year. The major highlight was getting started on my first full time job in Antwerp, Belgium. This was the biggest change in my life so far. I’ve learnt a vast amount of things on the office floor, and that’s more than only technical stuff. I was lucky to work with some very interesting and intelligent people, that enriched me all along.
Standing in front of the Whirlpool Rapids defining the border between North America and Canada.
Another big highlight would be the trip I made with my family to Canada during the summer. I’ve never been this far away from home, but I had a great time. Would definitely recommend.
Besides all that great stuff, life went as life goes. There were awesome moments, moments of joy, as well as less pleasant moments.
A new year, new challenges
2017 Will bring more changes. Early January you can expect a small update on my homepage and LinkedIn profile. What I can say is that Java programming will be the core of that change (at my great joy). This will also involve studying for some certificates (including OCA and OCP). Once again, I expect 2017 to be a very enriching year, in general.
You can expect more updates on this blog as well. Most updates are likely to be Java-related and somewhat technical. These updates will be published as I see fit. There’s no need to publish when there’s nothing noteworthy to share. Besides tweeting new articles, I will also share them on a few additional social media. Whenever you’d like to engage with me, I’ll always do my best to read and reply.
As I was working on a small application, I started implementing a custom JToolTip to be used throughout the app, in stead of Swing’s default JToolTip.
The custom tooltip entirely inside the JFrame.
Testing the application I was surprised by the behavior of the tooltips when they would exceed the borders of a JFrame (exceeding for a pixel was enough).
In the image below, you can notice that a background (default Swing Color) is present for the tooltip component. This background was not present for the exact same tooltip if it appeared inside the frame. So, the goal was to remove this background.
The custom tooltip exceeding the JFrame’s border.
First thing that came in mind was, ‘I should change the background to a transparent one’. And so I did, by calling this line on the JToolTip (mind the last parameter, the alpha value of the color):
setBackground(new Color(255, 255, 255, 0));<br />
Obviously that didn’t do the trick, but it was one step closer to the solution. In fact, someone pointed out that when the component surpasses the frame’s borders, it is actually added to a JWindow prior to being displayed.
SwingUtilities provides a method that returns the Window of a specified component:
SwingUtilities.windowForComponent(...);
It sufficed to update the background color of the window, in which the tooltip was housed, with a transparent one (alpha value of 0).
As an additional measure I made sure all the parent components of the tooltip were set to be non-opaque.
The final solution could be implemented in the overridden addNotify() method:
In the above code, you may notice the catch block handling potentially raised exception: IllegalComponentStateException. It was vital to add that catch statement in. A tooltip inside a frame, not exceeding the borders, is not added to a JWindow before being displayed. This means no window background should be changed, as there would be no window.
Find the question on StackOverflow for further reference.
Manage Consent
To provide the best experiences, we use technologies like cookies to store and/or access device information. Consenting to these technologies will allow us to process data such as browsing behavior or unique IDs on this site. Not consenting or withdrawing consent, may adversely affect certain features and functions.
Functional
Always active
The technical storage or access is strictly necessary for the legitimate purpose of enabling the use of a specific service explicitly requested by the subscriber or user, or for the sole purpose of carrying out the transmission of a communication over an electronic communications network.
Preferences
The technical storage or access is necessary for the legitimate purpose of storing preferences that are not requested by the subscriber or user.
Statistics
The technical storage or access that is used exclusively for statistical purposes.The technical storage or access that is used exclusively for anonymous statistical purposes. Without a subpoena, voluntary compliance on the part of your Internet Service Provider, or additional records from a third party, information stored or retrieved for this purpose alone cannot usually be used to identify you.
Marketing
The technical storage or access is required to create user profiles to send advertising, or to track the user on a website or across several websites for similar marketing purposes.